Triangular bandages are a versatile and essential component of any first aid kit. They can be used in a variety of ways to support, immobilize, and protect injured body parts. Understanding the different techniques for using triangular bandages can be crucial in emergency situations. Here, we’ll explore ten different types of bandaging using a triangular bandage.

1. Arm Sling
Purpose: To support and immobilize an injured arm or shoulder.
Steps:
-
Place the triangular bandage under the arm with the point of the bandage towards the elbow.
-
Bring the two ends up and tie them around the neck.
-
Fold the bottom point over the arm and pin it to the bandage near the shoulder or use a safety pin.

2. Broad Fold Bandage
Purpose: To support and immobilize larger body parts like the chest, abdomen, or back.
Steps:
-
Fold the triangular bandage in half to form a broad strip.
-
Wrap the bandage around the injured area.
-
Tie the ends securely to hold the bandage in place.
3. Narrow Fold Bandage
Purpose: For securing splints or dressing wounds.
Steps:
-
Fold the triangular bandage into a narrow strip.
-
Wrap it around the splint or dressing.
-
Tie the ends securely to keep everything in place.

4. Head Bandage
Purpose: To protect and secure a head wound.
Steps:
-
Place the bandage over the head with the point at the nape of the neck.
-
Bring the two ends over the forehead, cross them, and bring them back around to tie at the nape.
-
Tuck the point over the top and pin it.

5. Hand Bandage
Purpose: To secure a dressing on a hand wound.
Steps:
-
Lay the bandage flat with the point towards the wrist.
-
Wrap the ends around the wrist and hand.
-
Tie the ends securely and tuck the point over the back of the hand.

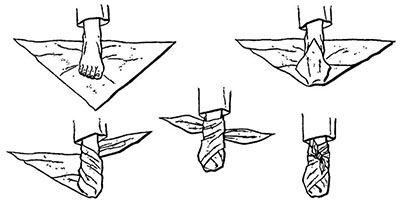
6. Ankle Bandage
Purpose: To immobilize and support an injured ankle.
Steps:
-
Place the bandage under the foot with the point towards the toes.
-
Cross the ends around the ankle and tie them securely.
-
Bring the point up over the foot and secure it with a pin.

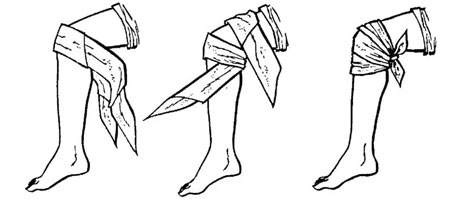
7. Knee Bandage
Purpose: To provide support and immobilize an injured knee.
Steps:
-
Lay the bandage under the knee with the point towards the back.
-
Bring the ends around the knee and tie them securely.
-
Tuck the point over the knee and pin it.

8. Elbow Bandage
Purpose: To immobilize and support an injured elbow.
Steps:
-
Place the bandage under the elbow with the point towards the forearm.
-
Bring the ends around the arm and tie them securely.
-
Fold the point over the elbow and pin it.

9. Eye Bandage
Purpose: To protect and cover an injured eye.
Steps:
-
Fold the bandage into a narrow strip.
-
Place the middle of the bandage over the injured eye.
-
Tie the ends securely around the head.

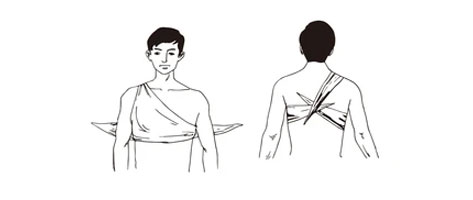
10. Chest or Back Bandage
Purpose: To immobilize and support an injured chest or back.
Steps:
-
Place the bandage over the chest or back with the point down.
-
Bring the ends around the body and tie them securely.
-
Fold the point up and pin it.
Conclusion
Triangular bandages are invaluable in first aid due to their adaptability and ease of use. By mastering these ten bandaging techniques, you can provide effective support and care in various emergency situations. Always ensure that bandages are applied snugly but not too tight, and seek professional medical assistance as soon as possible after administering first aid.
* Ticare Medical Wholesale High Quality Triangular Bandage, Please click contact us for a free quote!


